We felt so helpless when my brother-in-law, suddenly passed away in January. He lived about 12 hours away from us and there was so much red tape to get through. His friends were very much family to him and Cassey is one of the best! She was there for him, through thick and thin and we felt so much gratitude toward her.
I decided to make her an afghan to thank her for all she has done. She was there when he passed away and was instrumental in helping make final arrangements. We can never thank her enough for all she did for Mike.
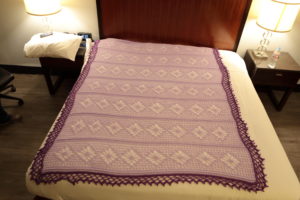
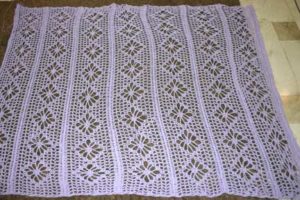
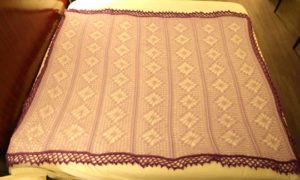
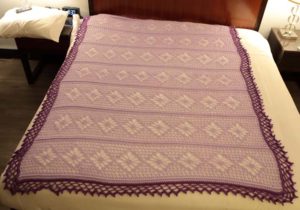
Purple Cassey
I made the afghan purple, because purple was Mike’s favorite color. I made it more lacey looking, for Cassey.
Materials:
crochet hook K
(I didn’t keep track, very well, of how much yarn I used. Guessing I would say 8-10 skeins of the lighter purple and 2 of the contrasting darker color.)
The main color of this afghan is orchid 
The contrasting color is a deep purple (this is the purple Mike loved) 
Stitches:
sl= slip stitch
ch= chain
sc= single crochet
dc= double crochet
sk= skip
tr= treble
When slip stitching in front loops, that means to only go through the front loop, yarn over and pull through both loops.
dc back loops- only put your hook through the back loops and double crochet like you are used to doing.
Directions:
Ch 145
Row 1: sc in second ch from hook, sc across
Row 2: ch 3, turn, counts as 1st dc, dc across (144)
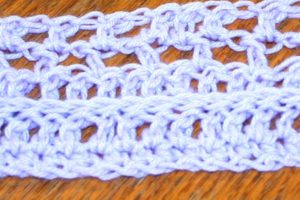
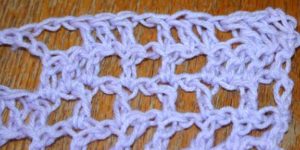
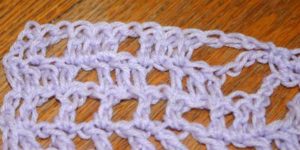
You can see the raised ridge that is created by slip stitch crocheting in the front loops.
Row 3: ch 1, turn, slip st front loops
Row 4: ch 3, dc back loops
Row 5: ch 4 turn (1st dc &h 1), sk 1 dc, dc, ch sk 1 dc, dc in last ch 3 space
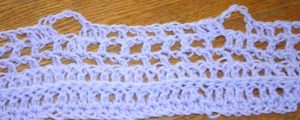
Row 6: ch 3, dc, *ch 1, skip 1, dc in dc, repeat this 7 times, after the 7th dc, dc in ch space, dc in next dc, repeat the whole sequence from the * across. There should be 6 dc posts between each cluster of 3. 8 sets of 3 dc together. (Ends with 7 dc posts)

The square boxes have clusters of 3 and there are 6 dc posts between the clusters.
Row 7: ch 4 turn, dc in next dc, *ch 1, skip 1, dc next dc, repeat this sequence 5 times, dc in next ch space, dc in next dc, ch 5, skip 1 dc, dc next dc (last dc in set of 3 on previous row) repeat from * across. (1st set has 6 dc posts. 4 dc post between the rest of the sets) dc in last 3 dc and dc in top of ch 3
Here we begin to make the bottom of the flower.
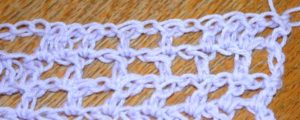
Here’s what the end of the row looks like
Row 8: ch 3, dc, ch 1, dc, dc in ch, dc in dc, *ch 1, skip ch, dc in dc, ch 1, skip ch, dc in dc, ch 1, dc, dc in ch 1 space, dc in dc, ch 4, skip 2 dc, skip 2 ch, sc in 3rd ch space, ch 4, skip 2 ch, skip 2 dc, dc next dc, dc in ch, dc in next dc space, repeat across * ( 2 posts between sets of 3, 17 sets of 3) row ends with a ch 1 dc in top of ch 3
Now, we have the bottom 3 petals!
Row 9: ch 3, dc in ch, dc in next dc,* ch 1, skip ch, dc in next dc, dc in ch, dc in dc, ch 4, skip 2 dc, skip 3 ch, sc next ch, sc in sc, sc in next ch, ch 4, skip 3 ch, skip 2 dc, dc in last set of 3 dc, dc in ch, dc in next dc, repeat across * row ends with 4 dc in last 2 chs and 2 dcs (this row begins with 3 sets of 3 and ends with 3 sets of 3, 2 sets of 3 between the chs and 3 sc in the middle of the chs)
This takes us to the middle of the flower.
This is how the end of the row looks
Row 10: ch 3 dc, ch 1 skiip dc, dc next dc, dc in ch, dc next dc, ch 1 skip dc, dc next dc, dc in ch, dc in dc, *ch 4, skip 2 dc, skip 3 ch, sc in ch, sc next 3 sc, sc ch, ch 4, skip 3 ch, skip 2 dc, dc in next dc, dc in ch, dc in dc, repeat across from * (row ends with 2 sets of 3 dc, ch1 and a dc on the very end in the top of the ch 3)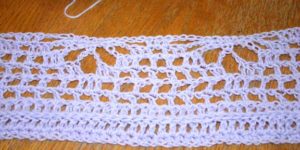

Notice how there is just one group of 3 between the 2 flowers
End of the row
Row 11: ch 3 turn, dc in ch, dc next dc, ch 1 skip dc, dc next dc, ch 1, dc in ch, dc, ch 1 skip dc, * dc next dc, dc in next 2 ch, ch 4, skip 2 ch, skip 1 sc, sc in next 3 sc, ch 4, skip sc, skip 2 ch, dc next 2 ch, dc in next dc, ch 1, skip dc, repeat across * end of row ch 1, skip dc, dc next dc, dc in ch, dc next dc, ch 1 skip dc, dc next dc, dc in ch, dc last 2 dc
This row has 2 sets of 3 between flowers
Row 12: ch 3 turn, dc 2nd dc, ch 1, skip, dc next dc, ch 1 skip, dc next dc, ch 1 skip, dc next dc, * ch 1 skip, dc next dc and in next 2 chs, ch 4, skip 2 ch skip 1 sc, sc in next, ch 4, skip 1 sc, skip 2 chs, dc in next 2 chs and next dc, ch 1, skip dc, dc next dc, ch 1 skip ch, dc next dc, repeat across * (2 sets of dc posts between sets of 3 dc) row ends with 2 posts between 2 sets of 3 dc, ch 1 dc in top of ch 3 of last row.
Between the flowers there are 2 sets of 3 and 2 single dc posts
Row 13: ch 3, dc in ch, dc next dc, ch 1, skip dc, dc next dc,ch 1 skip, dc next dc, ch 1, skip, dc, ch 1, skip, dc, ch 1 skip dc, ** dc next dc, dc next 2 chs, ch 1 skip 2 chs, skipsc, skip 2 chs, dc next 2 chs an in next dc, ch 1 skip dc, dc next dc, *ch 1 skip ch, dc next dc, 3 times, ch 1 skip dc, repeat across from ** (4 dc posts between sets of 3) end of row 4 dc
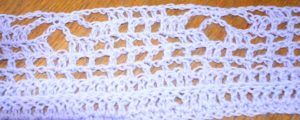
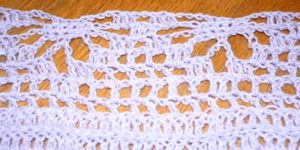
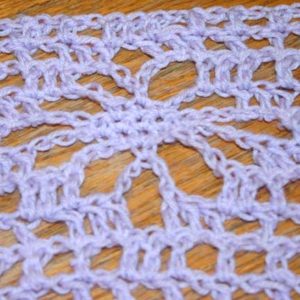
This row closes your flower. It looks so pretty with a diamond shape in the center of the petals.
Row 14: ch 3, dc next dc,* ch 1, skip dc, dc next dc, repeat 7 times, dc next ch, dc next dc, repeat from * across, (6 dc posts between sets of 3) dc in top of ch 3
Row 14 is just like row 6
Row 14 gives stability to the flower
Row 15: ch 3, turn,dc in dc, * ch1 skip 1, dc next, across, dc in ch
Between each section of flowers is this grouping that adds stability to the project and has a row of slip stitch that makes this ridge. Make sure the ridge is always on the same side of your work. The side with the ridge is the right side.
Row 16: ch 3, dc in each ch and dc across
Row 17: ch 1 turn, slip stitch front loops across
Row 18: ch 3, turn, dc in back loops across (144)
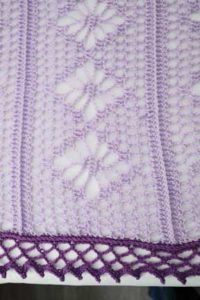
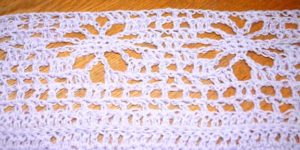
Rows of flowers
Row 19-84: repeat rows 5-18 (You will have 7 sections of flowers)
7 sections of flowers
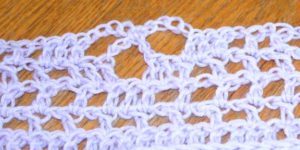
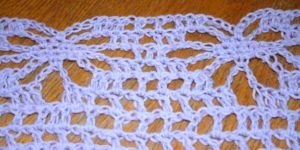
Lattice Border
Row 1: With right side facing you join contrast with a slip stitch, sc across, sc in same sc you did slip stitch.
2 sc each corner
228 sc on each side
Row 2: slip stitch to join in 1st sc, ch 1, sl front loops, join with sl in 1 st ch
Row 3: Don’t turn, sc in back loops behind sl stitches, 2 sc in each 2 corner scs
Join w/ sl 1st sc
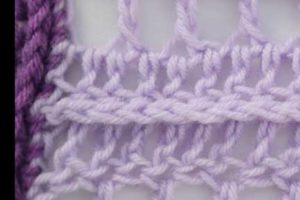
I found this great lattice looking border and it is perfect for finishing off this lacey piece! You can check out the original pattern here http://www.woolcrafting.com/crochet-lattice-edging.html
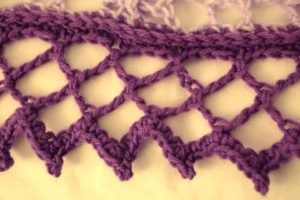 Row 4: *ch 5, skip 3 sc, sl stitch next, repeat* sl stitch in last sc
Row 5: *Ch 5, sl stitch in 3rd ch of previous row * repeat from * chain 3, 1 treble in last stitch.Turn.
Row 6: *Chain 5, slip stitch in 3rd of next 5 chains,repeat from * ending with slip stitch in last stitch. Turn.
Row 7: *ch 1,sc in 1st 2 ch, in 3rd ch sc 2 times, ch 3, sl in 1st ch just made, make a 3rd sc in 3rd ch, sc in next 2 ch and in slip stitch, repeat*


3 Comments
Leave your reply.